Showing posts with label DiyDecember. Show all posts

Saturday, December 26, 2015

Baby Hat & Booties

With a few Christmas "parties" in the books I can start to share a few more of my DiyDecember projects!


With baby Maggie joining the family this year I was excited to dig out my crochet hooks and yarn!  I had to "re-learn" a little bit so hopefully it won't be so long before I pick them up again!

Thankfully a baby hat is a pretty simple project.  I did a very basic round pattern of double crochets.

The flower is a five petal "daisy"...

-1- Chain 5, join with sl-st
-2- Ch 4, 3 Tc, Ch 4 all in first chain of foundation ring
-3- Repeat step 2 in each of the remaining 4 chains to form 5 petals.
-4- Tie off, add button if desired


The booties were a first for me, but I finally found a simple and quick pattern, modified it just a little, and they turned out pretty cute I think.  They can be tall or folded down!


 ch: chain, sl st: slip stitch, sc, single crochet, hdc: half double crochet, dc: double crochet, hdctog: half double crochet decrease, dctog: double crochet decrease, 

Foundation: Chain 9
Round 1:      2 hdc into 3rd chain from hook (skip 2 chains), 1 hdc in each of next 5 chain, 6 hdc into last chain,  (working down other side of chain): 1 hdc into each of next 5, 3 hdc in last chain, sl st into chain 2 (the 2 you skipped)

Round 2:   ch 3, 1 dc into first stitch, 2 dc each into next 2 stitches, 1 dc into each of the next 5, 2 dc each into the next 6, 1 dc each into the next 5, 2 dc each into the last 3 stitches. sl st into chain 3.

Round 3:   ch 2, 1 hdc in each stitch back-loop only (34-including ch 2)

Round 4:   ch 2, 1 hdc each into next 8 stitches, 8 hdctog, 1 hdc each next 9 stitches, sl st into chain 2

Round 5:   ch 2, 8 hdc each into next 8 stitches, 4 dctog, 1 hdc each next 9 stitches, sl st into chain 2

Round 6:   ch 1, 1 sc into each stitch all the way around. sl st into 1st sc (22)

Round 7:   ch 1, 1 hdc into each stitch all the way around.  sl st into 1st hdc (22)

Round 8:   ch 1, 1 dc into each stitch all the way around. sl st into 1st hdc (22)

 --- Repeat rounds 7 & 8 until desired cuff height--- 


There is more to come!!!   Merry Christmas

PS : I'll try to improve my photography effort

Tuesday, December 15, 2015

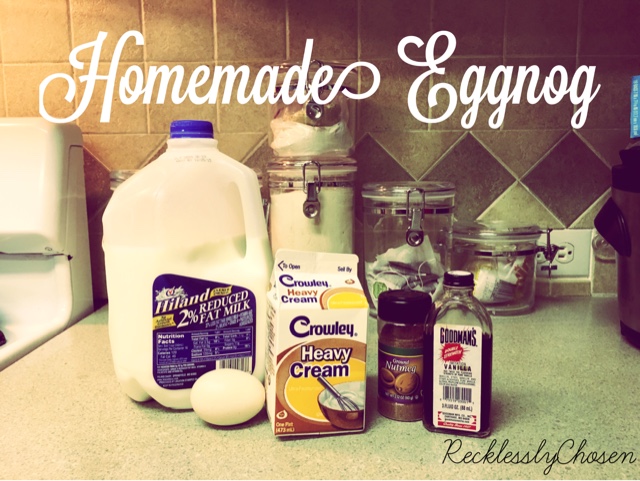
Homemade Eggnog

My husband loves eggs and custards,

I don't do custards,
...don't even like the word,
Custard , doesn't sound edible to me!

Anyways, he also loves eggnog, which I can stand a little of! I still remember the first time I ever tried it, I was in a mall with my mom and grandma where one of the vendors was handing out samples. Grandma insisted that I try it.  Funny thing is I don't remember what my original reaction to it was!     

This year I thought I would try making some after he finished off the 2 - 1/2 gallons I had bought.


There were soooo many different versions, using all different ingredients...in addition to the main milk, eggs, vanilla! 


Here is one that I found and slightly adapted...
--------------------------------------------------------------------------------------------------------------------------

Non-Alcoholic Eggnog Recipe

3 cups milk
1 cup heavy cream
1/2 cup sugar
4 large eggs
2 teas vanilla
nutmeg

1. Whisk together milk, cream, sugar, and eggs in medium-sized nonreactive saucepan.

2. Cook over low heat, whisking constantly, until the mixture thickens slightly, about 5 minutes.
(be sure not to cook too hot **see below**, and when whisking be sure to keep from sticking to bottom)

3. Mix in nutmeg to taste. Serve immediately or refrigerate. (If it gets too thick with refrigeration, thin with milk)
--------------------------------------------------------------------------------------------------------------------------

This is a super simple recipe for excellent homemade eggnog.  I do have a suggestion that might keep you from thinking you failed and dumping it all out...

Control your gag reflex before you read on...

After we refrigerated it and decided it was time to give it a try, there was some, well...
There were small chunks in it...

Totally gross I know.  

Although I did not let it boil, I assumed I did probably over cook it or get it too hot and caused the eggs to begin to set.  

So instead of dumping it down the drain, I just poured it through some cheese cloth, and...


What!? Did you think you would see a festive, perfectly garnished class of nog!? Sorry!!! It didn't last that long!!!

Hope you enjoy!!!

Wednesday, December 9, 2015

Late December kickoff...

 It's that time of year...things are CRAZY busy!!!
Update: They are getting so big...


Here are a few of them during the last "photo shoot," Precious!!! 

In addition to a couple extra fur babies to take care of, November was consumed with Operation Christmas Child!  Brett and I were first time coordinators for a new drop-off relay center...I will fill you in in the details in a separate post! 

It's so hard to believe Christmas is just a few weeks away! If anyone knows me very well, you know my heart is made of ribbon, & fabric, & glue, & paint, and it's just basically Hobby Lobby all bottled up! I'm so full of ideas and projects, yet my schedule says "ain't got time for that!"  I LOVE giving gifts that I have created, I feel like there is a little piece of me in it! (If you have ever used a hot glue gun you know there probably, literally is!)

 Sooooo, I'm going to try and give you a little bit of #DiyDecember15 , the impending season honoring the greatest Gift of all has got me itching to gift my little heart out! The sink is full of dirty dishes but I'm on the couch with a hook in my hand and yarn in my lap! The clutter needs controlled, but my kitchen table is a sewing & cricut table.  So stick around and let me show you what I'll be tieing bows around in a few weeks (besides the balls of cuteness above)!!!